A few things about RepperPro. It is free to try for 7 days. The 7 day trial is the whole program, and it is available for Mac and PC. You can get the Free Demo Here! If you like the program enough like I did, you can buy it for $37 american.
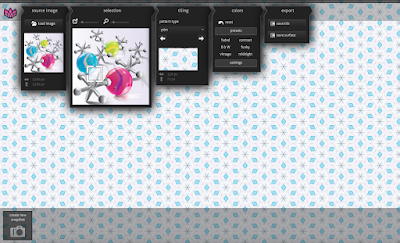
When I first opened up RepperPro there was a test image to use. I was instantly drawn in. I played with the test image for about an hour. I WAS HAVING SO MUCH FUN! You know those Kaleidoscopes you used to play with as a kid? This is basically that, in program form with a save option. This program is fast. When you move your selection square around the image to see different patterns, it is seamless. I made like 50 different patterns that very first day. Here is what the interface looks like:
 |
| When you first load RepperPro you will have the test image. I was really over excited so I loaded my own image. :) Click to enlarge! |
The second tab is magical. It is where you take a selection of your image and make patterns out of it. You can resize and drag the selection box around your picture, giving you an almost infinite range of generated patterns from one image! There are two options in this box. The icon with a box and an arrow shooting out of it is the image preview size. You can change how large or how small you want your source image to be shown. The second option, the magnifying glass, lets you zoom in and out of your created pattern. This is especially useful if you would like to see how a pattern would look tiled over a large area for textiles, or to give you an idea of how the pattern looks like overall. It does resize the tile too however, so if you would like to export larger patterns generally, make sure to change it back to max.
Fun shortcut I learned: If you click on the pattern itself and drag your cursor left and right, you can change the size of the pattern that way. This doesn't change the tile size, just gives you a preview.
The third tab is the tiling tab. It has 16 pattern options to choose from. 8 are seamless patterns, and the other 8 have visible edges. The menu actually tells you which ones will have visible edges, and which ones are seamless. This tab also shows you what your tile looks like, and tells you how big your tile is in pixels. I spend a lot of time at this box too.
The fourth tab is colours. I don't use it much, but it can be useful if you made a pattern you really really love, and you want it in different colours without bringing it into illustrator or photoshop. This tab has preset colour/contrast settings you can choose from, or you can alter it manually yourself using the colour, brightness, contrast & tint bars in the settings dropdown at the bottom.
The fifth tab is where you export your creation. You can export it as a tile (save tile), or as a fully tiled pattern (save surface). When you click save tile, it will show you what your tile looks like and gives you a dropdown of what you can save it as. You have the choice of .jpg, .png and .tif.
In the save surface option, you can choose how big you want the whole pattern to be, and how many times you would like your tile to repeat. The max size seems to be 2800 px, and the max times you can make your pattern tile is 100 times. You can also save these as .jpg, .png and .tif.
Okay so that was long and boring sorry! Now for the fun stuff. I made SO MANY PATTERNS out of this one drawing:
 |
| Marbles and Jacks, one of my daily drawings from a long while back. It was a good picture to choose because of the clean vector gradients and shapes. |
Despite the minor bump I found of not being able to load images over 15MB in file size, and the fact that this is a relatively old program that I am not sure if the developers update anymore, I found this to be a pattern generator worth the $40 CAD that I paid, and I will definitely use it with any new patterns I make to see what else I can come up with.
Now, I don't have any pattern generators that I can compare this one to. Do you ever use pattern generators? What is your favourite one? Feel free to comment your experiences with pattern generators!


No comments:
Post a Comment